How to Make Crispy Peking Duck
I’m not going to pretend this is a quick weeknight dinner. Making crispy Peking duck takes time. But here’s the thing – it’s not actually that hard. Just needs patience.
I learned this recipe during a trip to Beijing back in 2019. My friend’s grandmother showed me her method, and honestly? It changed everything I thought I knew about duck. She didn’t speak much English, I spoke zero Mandarin, but good food has a way of translating itself.

Why This Recipe Wins
This isn’t some fancy restaurant technique that needs special equipment. You can make authentic Peking duck in your regular home oven. The secret is in the prep work, not expensive tools.
The skin comes out glass-crisp. Like, you can actually hear it crack when you bite into it. The meat stays juicy underneath. Not dry. Not tough. Just tender and flavorful.
Most recipes skip the air-drying step. That’s a mistake. The drying is what makes the skin crispy. Without it, you’re just making roasted duck. Good, sure. But not Peking duck.
This method also renders out most of the fat. So you get all that rich duck flavor without feeling like you ate a stick of butter. The fat drips away during roasting, leaving just the crispy skin behind.
Equipment You’ll Need
Here’s what helped me when learning how to make crispy Peking duck:
- A whole duck (4-5 pounds works best)
- A roasting rack – the kind that lets air circulate underneath
- A large roasting pan to catch all the drippings
- Kitchen twine for tying things closed
- A pastry brush for glazing
- A meat thermometer – don’t guess on this
- Paper towels (you’ll use a lot)
I tried using a bike pump once to inflate the skin like traditional recipes say. Didn’t work. Felt ridiculous. Just use your hands to separate the skin. Works fine.

Ingredients You’ll Need
The ingredient list is short. The technique is what matters.
For the Duck
- 1 whole duck (4-5 pounds) – Fresh is better than frozen, but frozen works if you thaw it completely. Younger ducks have more tender meat.
- 2 tablespoons maltose or honey – This creates that glossy, dark mahogany skin. Maltose is traditional, honey is easier to find and works almost as well.
- 2 tablespoons rice vinegar or white vinegar – Helps tighten the skin during the blanching step.
- 1 tablespoon soy sauce – Adds color and a hint of savory flavor to the glaze.
- 1 teaspoon five-spice powder – For the cavity seasoning. This is what makes it smell amazing while cooking.
- 2 teaspoons salt – Season inside and out.
- 3 slices fresh ginger – Goes inside the cavity with the seasonings.
- 2 green onions – Also for the cavity. Adds aromatics during roasting.
For Serving
- Chinese pancakes or flour tortillas (the thin ones)
- Hoisin sauce
- Sliced cucumber
- Sliced green onions
How I Make It
Okay, this is the actual process for making crispy Peking duck. Take your time with it.
Day One – Prep and First Dry
Step 1: Clean the duck. Remove anything inside the cavity. Trim excess fat around the neck and the back opening. Pat everything completely dry with paper towels. I mean completely. Any moisture left on the skin will prevent crisping.
Step 2: Separate the skin. This part feels weird at first. Gently slide your fingers between the skin and the meat. Start at the neck opening. Work your way down the breast and around to the legs. Be careful not to tear the skin. You want to create an air pocket all around.
Step 3: Season the cavity. Mix the five-spice powder with 1 teaspoon of salt. Rub this inside the duck cavity. Add the ginger slices and one green onion inside. Close the cavity opening with a skewer or tie it shut with kitchen twine.
Step 4: Blanch the duck. Bring a large pot of water to a rolling boil. Hold the duck over the sink by its neck (or use tongs). Slowly pour the boiling water over the entire duck. Turn it as you pour. This tightens the skin. You’ll see it contract. Let all the water drain off.
Step 5: Make the glaze. Warm the maltose or honey with the soy sauce and vinegar until it’s liquid and smooth. Brush this all over the duck skin. Every inch. Don’t skimp.
Step 6: Air-dry overnight. This is crucial. Set the duck on a roasting rack over a pan. Put it in the fridge uncovered. Leave it for 24 hours minimum. 48 hours is even better. The skin needs to dry out completely. This creates that crispy texture when roasted.

Day Two – Roast the Duck
Step 7: Bring to room temperature. Take the duck out of the fridge 30 minutes before roasting. Brush on another layer of the glaze if you have any left.
Step 8: Roast hot, then lower the heat. Preheat your oven to 425°F. Place the duck breast-side up on the roasting rack. Roast for 20 minutes at this high heat. This renders the fat fast.
After 20 minutes, lower the temperature to 350°F. Continue roasting for another 60-75 minutes. The skin should turn a deep reddish-brown. Use a meat thermometer – you want 165°F in the thickest part of the thigh.
Step 9: Rest before carving. Let the duck sit for 15 minutes after you take it out. This lets the juices redistribute. Don’t skip this step.
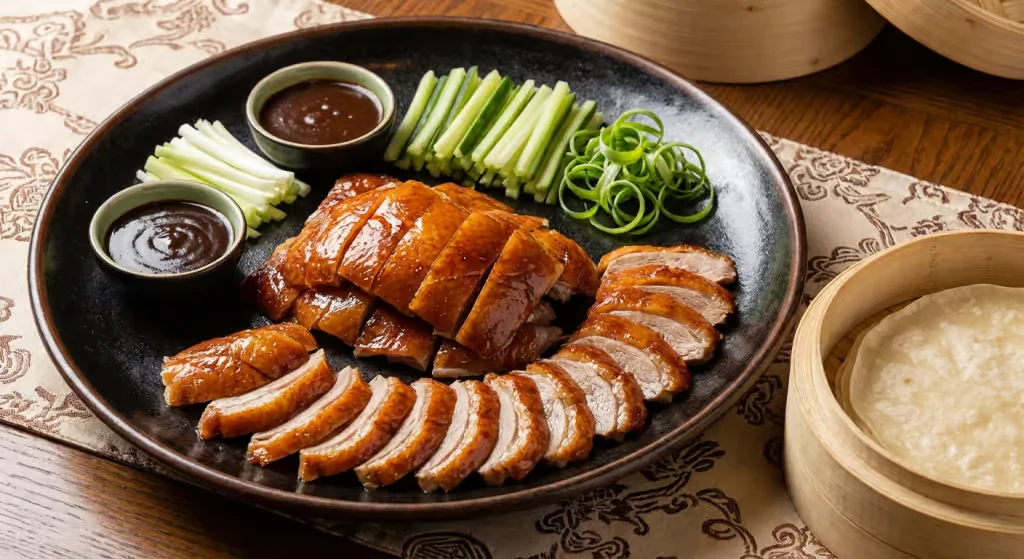
How to Serve Crispy Peking Duck
Carve the crispy skin off in thin strips. Slice the breast meat thin. Shred the leg meat. Serve everything with warm pancakes, hoisin sauce, cucumber, and green onions.
Let people assemble their own. Spread hoisin on a pancake, add some meat, some crispy skin, vegetables. Roll it up. That’s it.
Tips That Make a Difference
Here’s what I learned the hard way so you don’t have to.
The drying time matters more than anything else. I know 24-48 hours seems long. But this is what separates crispy skin from soggy skin. Don’t rush it.
Use a rack. Never put the duck directly in the pan. Air needs to circulate all around it. Otherwise the bottom stays soft and fatty.
Save the fat. All that rendered duck fat in the pan? Keep it. Store it in a jar in the fridge. Use it for cooking potatoes or vegetables later. It’s liquid gold.
Room temperature matters. A cold duck from the fridge going straight into a hot oven cooks unevenly. Let it warm up a bit first.
Don’t have maltose? Honey works. Corn syrup works too. You just need something sticky and sweet for that glaze.
Easy Variations
Quick version: Skip the cavity seasonings and just use salt and pepper. Still tastes great. Not traditional, but good.
Different glazes: Try mixing honey with a little sesame oil instead of the traditional glaze. Gives a nuttier flavor.
Spicier version: Add some Sichuan peppercorns to the cavity seasoning. Or brush the skin with chili oil before the final roasting.
Western serving style: Forget the pancakes. Serve the sliced duck over rice or with roasted vegetables. Makes a great dinner plate instead of the wrap style.
Storage and Reheating
Leftover Peking duck keeps for 3-4 days in the fridge. Store the meat and skin separately in airtight containers.
For reheating, here’s the trick: don’t use the microwave. It makes the skin soggy and sad.
Put the duck pieces on a baking sheet. Reheat in a 375°F oven for 8-10 minutes. This re-crisps the skin. The meat warms through without drying out.
You can also shred leftover duck and use it in fried rice. Or noodle soup. It freezes okay too – up to 2 months in a freezer bag. Thaw overnight in the fridge before reheating.
FAQs About Making Peking Duck
Can I make Peking duck without air-drying it overnight?
Technically yes, but the skin won’t be as crispy. You’ll get roasted duck, not true Peking duck. The air-drying is what creates that glass-crisp texture. If you’re short on time, at least dry it for 8 hours. But really, plan for the full 24-48 hours. It’s worth it.
Why is my duck skin not crispy?
Three common reasons. First, you didn’t dry it long enough. Second, you skipped the blanching step that tightens the skin. Third, the duck is sitting in fat instead of on a rack where air can circulate. Make sure you’re doing all three things right.
What’s the best type of duck to buy for this recipe?
Look for a Long Island or Pekin duck (yeah, spelled different from the dish). They’re 4-5 pounds usually. Younger is better – more tender meat. Frozen works if fresh isn’t available. Just thaw it completely in the fridge for 2 days before you start. Pat it extra dry.
Can I use this method for wild duck?
Wild duck is leaner and gamier. The technique works, but the results are different. Wild duck won’t have as much fat to render, so it can dry out faster. Reduce the roasting time and watch the temperature closely. Don’t go over 160°F for wild duck.
Do I really need Chinese pancakes or can I use something else?
Flour tortillas work fine. The thin ones, not the thick burrito style. Warm them up before serving. You can also use lettuce wraps for a low-carb version. Or just skip the wraps entirely and serve the duck over rice. It’s your dinner.
A Final Note on Making Crispy Peking Duck
The first time I made this at home, I messed it up. The skin wasn’t crispy enough because I only dried it for 12 hours. I was impatient.
The second time, I followed the timing exactly. Left it in the fridge for two full days. When that duck came out of the oven with skin like crackling glass, I finally got it. This isn’t about fancy techniques. It’s about patience and doing the simple steps right.
My friend’s grandmother in Beijing knew this. She didn’t rush. She didn’t take shortcuts. She just did what needed doing and let time handle the rest.
That’s the real secret to learning how to make crispy Peking duck. Not some complicated trick. Just patience and respect for the process.
Try it this weekend. Give yourself the full two days. You’ll see what I mean when that first piece of skin cracks between your teeth.
*This post may contain affiliate links which means I may earn commissions for purchases made through links at no extra cost to you. See https://asianfoodsdaily.com/disclaimer/* for more infomation
Post your Comment
0 Comments
No comments yet. Be the first to share your thoughts!