How to Make Authentic Vietnamese Pho at Home
You want that deep, soul-warming bowl of Vietnamese pho you had at your favorite restaurant, but at home. This step-by-step pho guide shows you exactly how to make pho broth from scratch, even if you’ve never tried making Vietnamese beef noodle soup before.

Three years ago, my Vietnamese neighbor Mrs. Nguyen knocked on my door holding a container of beef bones. “You want to learn real pho?” she asked. I’d been buying those sad pho packets from the Asian market, and she’d had enough of watching me fail. That afternoon changed everything. She didn’t measure anything. She just cooked, tasted, and told stories about her grandmother’s pho stall in Hanoi. I scribbled notes while she laughed at my attempts to pronounce “phở” correctly. The broth simmered for hours while she taught me that patience is the secret ingredient nobody talks about.
Why This Vietnamese Pho Recipe Wins
This authentic Vietnamese pho recipe works because it doesn’t skip steps or fake shortcuts.
The broth needs time. That’s just how it is. You can’t rush it with pressure cookers or bouillon cubes and expect the same result. Mrs. Nguyen was right about that. The bones release their collagen slowly. The spices bloom in stages. The char on the onions and ginger adds a smoky depth you can’t get any other way.
This traditional pho bo recipe also uses ingredients you can find at regular grocery stores. Sure, an Asian market gives you more options. But you can make excellent pho with what’s available at your local store.
The best pho recipe at home is one you’ll actually make again. This one takes time but not constant attention. You can do other things while it simmers.
Ingredients You’ll Need for Vietnamese Pho

For the Broth:
4 pounds beef bones (knuckle and marrow bones work best) – These create the rich, silky base that makes pho broth special. The marrow adds body.
2 pounds beef chuck or brisket – This cooks in the broth and becomes your tender meat slices. Don’t skip this even if you only want the broth.
2 large onions – Charred until almost black. They add sweetness and that signature smoky note.
4-inch piece of ginger – Also charred. It cuts through the richness and adds warmth.
5 star anise pods – The main flavor you recognize as “pho.” Don’t use more or it gets medicinal.
4 whole cloves – Just enough for depth. Too many taste like grandma’s pomander balls.
2 cinnamon sticks – Real sticks, not ground cinnamon. They add subtle sweetness.
2 tablespoons coriander seeds – Toasted first. They bring a lemony brightness.
1 tablespoon fennel seeds – Optional but traditional. Adds a gentle licorice hint.
3 tablespoons fish sauce – This is not optional. It’s the umami backbone.
2 tablespoons salt – Start here and adjust at the end.
1 tablespoon sugar – Balances everything out.

For Serving:
1 pound dried pho noodles (bánh phở) – Wide, flat rice noodles. Fresh ones are great if you find them.
Thinly sliced raw beef (sirloin or eye round) – The hot broth cooks these at the table. Freeze the meat for 20 minutes first. Makes slicing easier.
Fresh herbs – Thai basil, cilantro, mint. A handful of each.
Bean sprouts – Raw and crunchy.
Lime wedges – Mandatory.
Sliced jalapeños – For heat.
Hoisin sauce and sriracha – On the side, not in the pot.
Essential Equipment for Making Vietnamese Pho
You need a big pot. I use a 12-quart stockpot because pho needs room. My first attempt used a 6-quart pot and the bones barely fit. The broth was fine but skimming was a nightmare.
A fine-mesh strainer is important for the final strain. A slotted spoon works for skimming scum during cooking. Tongs help with the charring step. A sharp knife makes slicing the meat possible. That’s really it.
How I Make Vietnamese Pho
Step 1: Parboil the Bones
Put the bones in your big pot. Cover with cold water. Bring to a boil and let it go for 10 minutes. You’ll see gray scum rise to the top. It looks gross. This step removes impurities that would cloud your broth later.
Drain everything. Rinse the bones under running water. Scrub off any remaining gunk. Rinse out the pot too.

Step 2: Char the Aromatics
Cut the onions in half. Don’t peel them yet. Turn a burner to high. Place the onion halves and ginger directly on the grate. Let them char until blackened on all sides. This takes about 10 minutes. Your kitchen will smell smoky. Open a window.
Once charred, run them under water and peel off the burnt outer layers. You want the char flavor but not actual burnt bits floating in your soup.
Step 3: Toast the Spices
Put your dry spices (star anise, cloves, cinnamon, coriander, fennel) in a dry pan over medium heat. Shake the pan occasionally. You’ll smell them wake up after about 3 minutes. Don’t walk away or they’ll burn.
Step 4: Build the Broth
Put the cleaned bones back in the pot. Add the beef chuck. Add the charred onions and ginger. Add the toasted spices. Fill the pot with about 6 quarts of water. The water should cover everything by 2 inches.
Bring it to a boil then immediately reduce to a bare simmer. You want tiny bubbles, not a rolling boil. Mrs. Nguyen said a boil makes cloudy broth. She was right.
Add the fish sauce, salt, and sugar.
Step 5: Simmer and Skim
Let it simmer for at least 6 hours. Eight is better. Ten is best if you have the time.
For the first hour, check every 15 minutes. Skim off any scum or foam that rises. After that, you can mostly leave it alone. Just make sure it stays at a gentle simmer.
After 3 hours, remove the beef chuck. It’s done. Let it cool, then slice it or shred it. Set aside.
Step 6: Strain Everything
Turn off the heat. Use tongs to remove all the bones and big aromatics. Pour the broth through a fine-mesh strainer into another large pot or container. The broth should be clear and golden.
Taste it now. Add more fish sauce if it needs depth. Add salt if it’s bland. Add a pinch of sugar if it’s too savory.
Step 7: Prep Your Noodles and Toppings
Cook the rice noodles according to the package. Usually it’s 3-5 minutes in boiling water. Don’t overcook them. They keep cooking in the hot broth.
Drain and rinse with cold water. Divide among bowls.
Slice your raw beef paper-thin. Arrange your herb plate with basil, cilantro, mint, bean sprouts, lime wedges, and jalapeños.
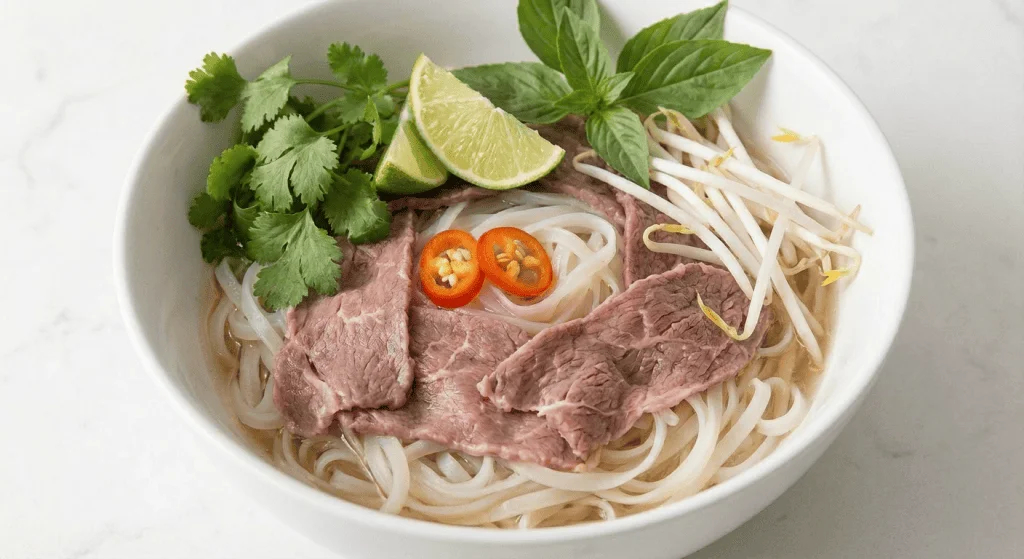
Step 8: Assemble Your Vietnamese Pho Bowls
Reheat the broth until it’s properly hot. Not warm. Hot.
Place noodles in each bowl. Add slices of the cooked beef chuck. Top with the raw beef slices. Ladle the boiling broth over everything. The broth cooks the raw beef instantly.
Serve with the herb plate and let everyone customize their bowl.
Tips That Make a Difference
Don’t skip the parboiling. I tried once because I was in a hurry. The broth was murky and had a weird smell. Those 10 minutes matter.
Keep the heat low. A rolling boil breaks down the fat into tiny particles that cloud everything. Low and slow keeps it clear.
Char properly. Blonde onions don’t cut it. You want actual black char. It tastes different.
Freeze your beef for easier slicing. Twenty minutes in the freezer firms it up. You can get those restaurant-thin slices.
Taste and adjust at the end. Every batch is slightly different. Trust your tongue.
Buy bones from the butcher counter. Ask nicely and they’re usually cheap or free. Beef knuckles and marrow bones are what you want.
Easy Variations for Your Vietnamese Pho
Chicken Pho (Pho Ga): Use a whole chicken instead of beef bones. Simmer for only 2 hours. The spices stay the same. The broth is lighter but still delicious.
Vegetarian Pho: Skip the bones. Use a mix of charred onions, lots of mushrooms (especially shiitake), and vegetable broth. Double the ginger. Add soy sauce instead of fish sauce. It won’t taste like traditional pho bo, but it’s good in its own way.
Spicy Vietnamese Pho: Add sliced fresh chili to the broth while it simmers. Or stir sriracha directly into your bowl. Some people add chili oil too.
Quick Weeknight Version: Use store-bought beef broth as a base. Toast your spices and simmer them with charred onions and ginger for 30 minutes. It’s not the same as how to make pho broth from scratch, but it works when you’re busy.
Storage and Reheating Vietnamese Pho
The broth keeps in the fridge for 5 days. It’ll gel when cold because of the collagen. That’s a good sign.
Freeze the broth in portions for up to 3 months. I use quart containers. Thaw overnight in the fridge.
Don’t store the noodles in the broth. They get mushy. Keep them separate in the fridge for up to 2 days.
Store the herbs and bean sprouts separate too. They wilt fast.
To reheat: Bring the broth back to a proper boil. Cook fresh noodles. Assemble as if making it new. Leftover broth makes the best easy homemade pho recipe because the hard part is already done.
Frequently Asked Questions
Can I make Vietnamese pho in less than 6 hours?
Technically yes, but it won’t have the same depth. Three hours gives you decent broth. Six hours is where it gets really good. Some people simmer for 12-24 hours. More time means more flavor pulled from the bones. If you’re short on time, try the quick weeknight version using store-bought broth as a base.
Why is my pho broth cloudy?
Usually because you skipped the parboiling or let it boil too hard. The rapid bubbling emulsifies the fat and protein into the liquid. Keep it at a bare simmer. If it’s already cloudy, you can clarify it with egg whites, but that’s a whole other process. Just keep the heat low next time.
What if I can’t find star anise?
Star anise is pretty essential to that recognizable pho flavor. Check the spice aisle at regular grocery stores or any Asian market. If you absolutely cannot find it, the pho won’t taste quite right. You could try a tiny bit of fennel as a substitute, but it’s not the same. Order star anise online if needed. It’s cheap and lasts forever.
Can I use a different type of noodles?
Real pho uses flat rice noodles (bánh phở). They’re usually labeled as “pho noodles” or “pad thai noodles.” Dried works great. Fresh is even better if you find them. In a pinch, other flat rice noodles work, but ramen or egg noodles don’t. The texture and taste are wrong. Rice noodles are available at most grocery stores now.
How do I know when the broth is done?
It should taste rich and full. The color should be clear and golden. If you press your lips together after tasting, they should feel slightly sticky from the gelatin. That stickiness means you’ve extracted the collagen from the bones. If it tastes watery or weak, keep simmering. You can’t really oversimmer pho broth as long as the heat stays low.
Final Note
Mrs. Nguyen moved back to Vietnam last year. Before she left, she made one last pot of pho and told me I’d finally gotten it right. She said her grandmother would approve. I’m not sure about that, but I know this recipe works. It takes time. Your kitchen will smell like Hanoi for a day. And you’ll have a freezer full of broth that makes weeknight dinners feel special.
The first time takes longer because you’re learning. The second time you’ll move faster. By the third time, you’ll understand why people make huge pots of this stuff. This pho noodle soup cooking tutorial gives you everything you need. The rest is just practice.
Make it this weekend. Invite people over. Pho is better with company anyway.
*This post may contain affiliate links which means I may earn commissions for purchases made through links at no extra cost to you. See https://asianfoodsdaily.com/disclaimer/* for more infomation
Post your Comment
0 Comments
No comments yet. Be the first to share your thoughts!