Asian-Style Chicken Rice Bowls

Who this is for: Anyone tired of boring chicken dinners who wants something fast, healthy, and packed with flavor. What problem it solves: You need a meal prep chicken bowl recipe that doesn’t taste like sadness by day three, and you want it done in under 30 minutes.
I still remember the first time I tried making Asian-Style Chicken Rice Bowls at home. It was a Tuesday night, I was exhausted, and takeout was calling my name. But I had chicken thighs in the fridge that needed using, and honestly? I made something better than any restaurant version I’d tried. The sticky sauce clinging to tender chicken, the fresh crunch of vegetables over warm rice—it became my go-to ever since. Now I make these healthy chicken rice bowls at least twice a week, and my family actually gets excited about leftovers.
At a Glance
Prep Time: 10 minutes
Cook Time: 15 minutes
Total Time: 25 minutes
Servings: 4 bowls
Difficulty: Easy (beginner-friendly)
Key Ingredients: Chicken thighs, soy sauce, ginger, garlic, rice
Best For: Weeknight dinners, meal prep, feeding picky eaters who “don’t like Asian food”
Why This Recipe Wins
Listen, I’ve tried dozens of easy Asian chicken bowl recipes. Most are either too sweet, too salty, or require seventeen ingredients I’ll never use again. This one works because:
- It uses chicken thighs instead of breasts, so you get juicy meat every time (no dry, sad chicken here)
- The sauce is a 4-ingredient situation that actually sticks to the chicken like those fancy teriyaki chicken rice bowls at restaurants
- Everything cooks in one pan except the rice, which means less cleanup when you’re already tired
- It tastes better on day two, making it perfect for meal prep
- Kids eat it without complaining (that alone is worth the recipe)
- You probably have most ingredients already, so no special grocery trip needed
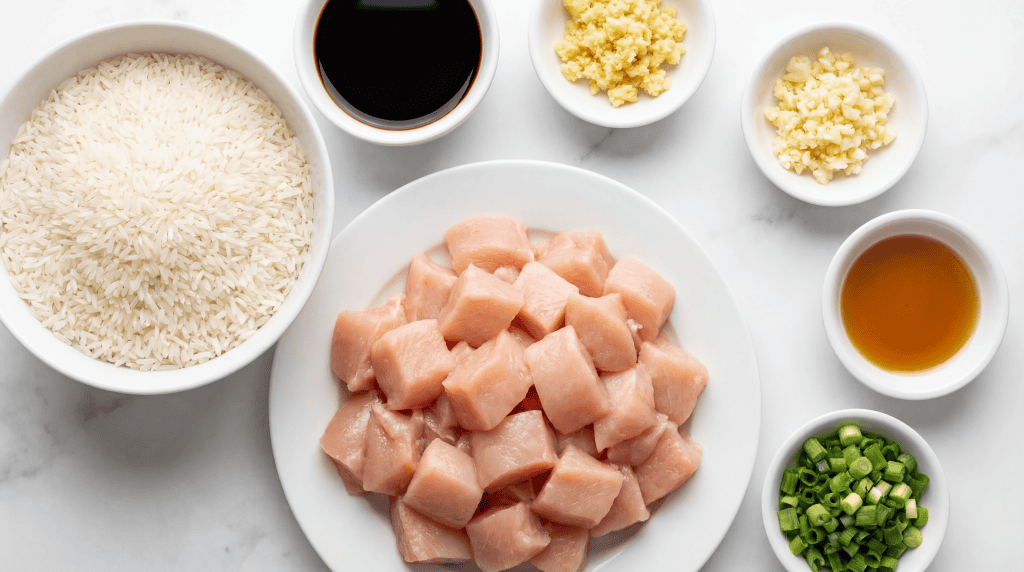
Ingredients You’ll Need
For the Sticky Chicken Rice Bowls:
1½ pounds boneless, skinless chicken thighs – These stay moist and flavorful. Breasts work too, but thighs are more forgiving if you overcook them slightly.
3 tablespoons soy sauce – This is your salt and umami base. I use low-sodium because the sauce reduces and gets concentrated.
2 tablespoons honey – Gives you that sticky glaze and balances the salty soy sauce. Maple syrup works in a pinch.
1 tablespoon rice vinegar – Adds brightness so the sauce doesn’t taste flat. Regular white vinegar is fine if that’s what you have.
2 teaspoons fresh ginger, minced – Game changer for authentic flavor. Jarred ginger works, but fresh is noticeably better here.
3 cloves garlic, minced – Because garlic makes everything better. No explanation needed.
1 tablespoon sesame oil – This is what makes it smell like an Asian fusion rice bowl. Don’t skip it.
2 cups cooked jasmine rice – Or whatever rice you like. I’ve used brown rice, cauliflower rice, even quinoa.
2 cups mixed vegetables – I use snap peas, shredded carrots, and edamame. Frozen stir-fry mix is perfectly acceptable.
Sesame seeds and sliced green onions for topping – Optional but makes it look like you tried.
Equipment You’ll Need
You don’t need fancy gear. Just grab a large skillet (non-stick makes life easier), a cutting board, a sharp knife, and a rice cooker or pot for the rice. That’s it. I use my 12-inch skillet because everything fits without crowding.
How I Make It
Step 1: Get Your Rice Going
Start the rice first. It takes the longest, and you want it ready when the chicken is done. I use a rice cooker and forget about it. If you’re cooking on the stove, follow the package directions. Nothing fancy here.
Step 2: Cut the Chicken
Cut your chicken thighs into bite-sized pieces, about 1-inch chunks. They don’t need to be perfect. Mine never are.
Step 3: Make the Sauce
In a small bowl, whisk together the soy sauce, honey, rice vinegar, ginger, and garlic. This takes maybe 30 seconds. The sauce looks thin now, but it’ll thicken up when it hits the hot pan.
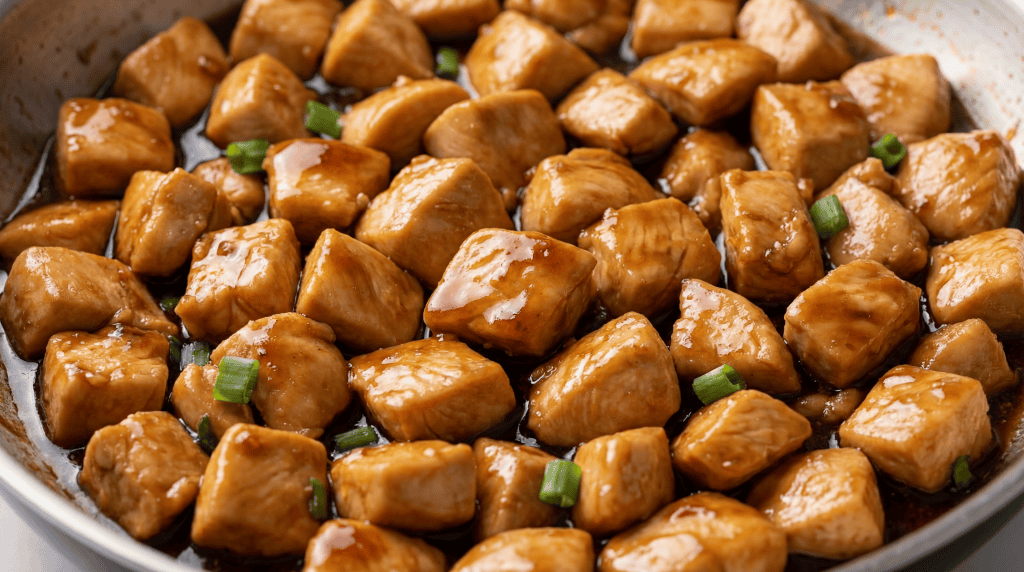
Step 4: Cook the Chicken
Heat your skillet over medium-high heat. Add a drizzle of regular cooking oil (not the sesame oil yet). When the pan is hot, add the chicken pieces in a single layer. Let them sit for 2-3 minutes without moving them. This is how you get that nice golden color.
Flip the pieces and cook another 2-3 minutes until they’re cooked through. I usually cut into the thickest piece to check. No shame in that.
Step 5: Add the Sauce
Pour your sauce mixture over the cooked chicken. The pan will sizzle and smell amazing. Let it bubble and reduce for 3-4 minutes, stirring occasionally. The sauce will get thick and glossy and coat the chicken. This is the magic moment.
Drizzle in the sesame oil at the very end. Give it a quick stir.
Step 6: Prep Your Vegetables
While the sauce is doing its thing, you can quickly steam or blanch your vegetables. I throw mine in the microwave with a splash of water for 2 minutes. Done.
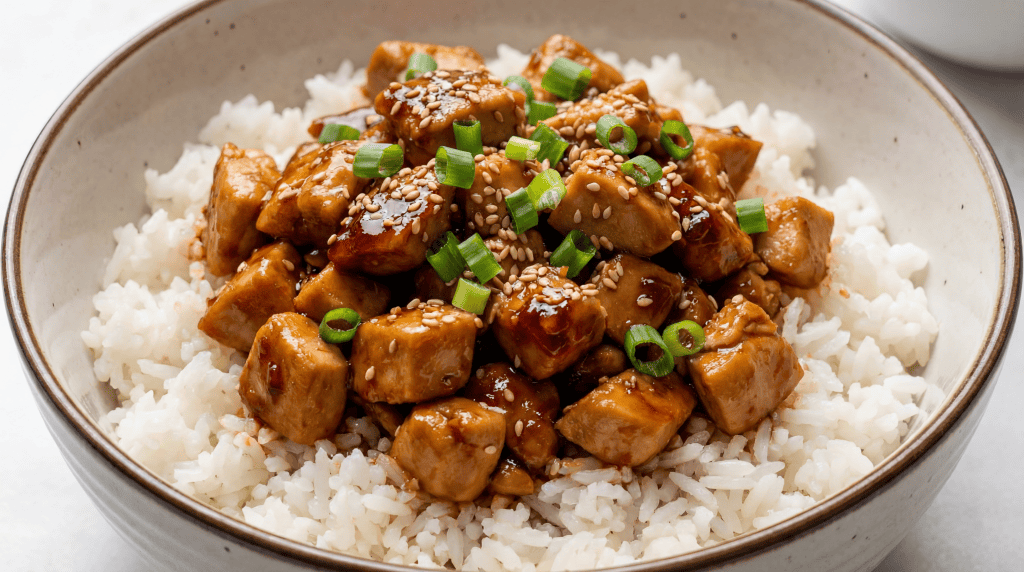
Step 7: Build Your Bowl
Scoop rice into bowls. Top with the sticky chicken and any sauce left in the pan (don’t waste that liquid gold). Add your vegetables on the side. Sprinkle with sesame seeds and green onions.
Eat immediately while it’s hot and the sauce is still glistening.
Tips That Make a Difference
Don’t crowd the pan. If your chicken pieces are touching each other, they’ll steam instead of getting that nice sear. Cook in batches if needed.
Taste your sauce before adding it. Different soy sauce brands have different saltiness levels. If yours tastes too salty, add a bit more honey or a splash of water.
Use a meat thermometer if you’re unsure. Chicken is done at 165°F. Takes the guesswork out.
Let the chicken sit undisturbed when you first add it to the pan. I know it’s tempting to poke at it, but patience gives you better color and texture.
Add vegetables at the end, not with the chicken. They’ll get overcooked and mushy otherwise.
If your sauce isn’t thickening, mix ½ teaspoon cornstarch with 1 teaspoon water and stir it in. Problem solved in 30 seconds.
Easy Variations
Spicy version: Add 1-2 teaspoons of sriracha or chili garlic sauce to the sauce mixture. My husband likes it hot, so I keep a bottle of sriracha on the table.
Teriyaki-style: Replace the rice vinegar with mirin and add an extra tablespoon of soy sauce. Now you’ve got a legit teriyaki chicken rice bowl.
Cashew chicken bowl: Toss in ½ cup of roasted cashews when you add the sauce. Adds crunch and makes it feel fancier.
Extra vegetables: Throw in broccoli, bell peppers, mushrooms, or zucchini. Whatever’s in your fridge works.
Different proteins: This sauce is great with shrimp (cook for just 2-3 minutes per side), salmon, or even tofu for a vegetarian version.
Low-carb version: Skip the rice and serve over cauliflower rice or zucchini noodles for a healthy chicken rice bowl that’s lighter.
Storage and Reheating
Storing: Keep the chicken, rice, and vegetables in separate containers if you’re meal prepping. They’ll stay fresh for 4 days in the fridge. If you’re storing leftovers from dinner, an airtight container works fine for 3-4 days.
Reheating: Microwave for 1-2 minutes until hot. Add a splash of water or extra soy sauce if it looks dry. The sauce can thicken up in the fridge, and a little liquid brings it back to life.
Freezing: The chicken and sauce freeze beautifully for up to 3 months. I don’t freeze the rice or fresh vegetables—they get weird. Just make fresh rice and vegetables when you’re ready to eat.
Meal prep tip: Make a double batch of the chicken on Sunday. Use it in these quick weeknight dinner bowls all week, or throw it in wraps, over salads, or in fried rice.
FAQs
Can I use chicken breasts instead of thighs?
Yes, but cut them thinner or they’ll take longer to cook. Thighs stay juicier, but breasts work if that’s what you have. Just watch them carefully so they don’t dry out.
What if I don’t have rice vinegar?
Use apple cider vinegar or white vinegar. Start with half the amount and add more if needed. Rice vinegar is milder, so regular vinegar can be stronger.
Is this recipe gluten-free?
Not as written because of the soy sauce. But swap in tamari or coconut aminos, and you’re good to go. Tastes almost identical.
Can I make this in advance for meal prep chicken bowls?
Absolutely. That’s how I use it most often. Make everything on Sunday, store in separate containers, and assemble throughout the week. The chicken actually gets better after sitting in that sauce overnight.
What’s the best rice to use for an Asian chicken rice bowl recipe?
Jasmine rice is my favorite because it’s slightly sticky and fragrant. But basmati, brown rice, or even white rice from a box works fine. I’ve used them all depending on what’s in my pantry.
Final Note
These Asian-Style Chicken Rice Bowls have saved my weeknight dinners more times than I can count. The sticky sauce, the tender chicken, the simplicity of throwing it all together—it just works. Make it once, and I bet it becomes your new regular rotation meal too. You’ll wonder why you ever bothered with takeout.
*This post may contain affiliate links which means I may earn commissions for purchases made through links at no extra cost to you. See https://asianfoodsdaily.com/disclaimer/* for more infomation
Asian-Style Chicken Rice Bowls
Main course10 minutes
15 minutes
35 minutes
Ingredients
- • 1½ pounds boneless, skinless chicken thighs
- • 3 tablespoons soy sauce
- • 2 tablespoons honey
- • 1 tablespoon rice vinegar
- • 2 teaspoons fresh ginger, minced
- • 3 cloves garlic, minced
- • 1 tablespoon sesame oil
- • 2 cups cooked jasmine rice
- • 2 cups mixed vegetables
- • Sesame seeds and sliced green onions for topping
Instructions
- 1 Get Your Rice Going
- 2 Cut the Chicken
- 3 Make the Sauce
- 4 Cook the Chicken
- 5 Add the Sauce
- 6 Prep Your Vegetables
- 7 Build Your Bowl
Post your Comment
0 Comments
No comments yet. Be the first to share your thoughts!